一、Yarn集群部署PyFlink作业
1.多种作业部署方式介绍
1
2
| # SingleJVM:启动一个minicluster,作业会提交到minicluster中执行
python3 pyflink_demo.py
|
1
2
3
| # SingleNode:启动本地flink,作业会提交到standalone集群中执行
$FLINK_HOME/bin/start-cluster.sh local
flink run -m localhost:8081 -py pyflink_demo.py
|
1
2
| # 提交作业时会为每个作业单独启动一个Flink集群
flink run -m yarn-cluster -yqu bigTask -py pyflink_demo.py
|
1
2
3
| # 先在Yarn上启动一个Flink集群,之后作业都会提交到该Flink集群
./yarn-session.sh
flink run -yqu bigTask -py pyflink_demo.py
|
2.配置Yarn+Flink集群环境
略
3.配置Python环境
1
| pip3 install apache-flink==1.12.0
|
1
2
3
4
|
python.client.executable: /usr/local/python3/bin/python3.7
python.executable: /usr/local/python3/bin/python3.7
|
4.确定线上部署方式
- Session模式:所有作业在一个Flink Session中管理,作业间资源隔离较差。
- Per Job模式:作业间资源隔离充分,适合大作业线上部署。
二、PyFlink Table/SQL API
Flink数据处理的流向:Source -> Transformation -> Sink
1.执行上下文
1
2
3
4
5
6
7
8
9
10
11
12
13
14
15
16
17
18
19
20
|
env = StreamExecutionEnvironment.get_execution_environment()
t_env = StreamTableEnvironment.create(env)
"""The param 'execution_environment' and 'environment_settings' cannot be used at the same time"""
env_settings = EnvironmentSettings.new_instance().in_streaming_mode().use_blink_planner().build()
t_env = StreamTableEnvironment.create(environment_settings=env_settings)
env = ExecutionEnvironment.get_execution_environment()
t_env = BatchTableEnvironment.create(env)
env_settings = EnvironmentSettings.new_instance().in_streaming_mode().use_blink_planner().build()
t_env = BatchTableEnvironment.create(environment_settings=env_settings)
t_env.get_config().get_configuration().set_string("parallelism.default", 1)
t_env.get_config().get_configuration().set_string("pipeline.jars", "file:///jar_path/xxx.jar")
|
2.算子
1
| Table API: select, alias, filter, where, group_by, distinct, join, join_lateral, order_by, window, to_pandas, execute_insert
|
对于一条完整的SQL语句,可以将其以字符串的形式传递给t_env.sql_query(...)方法,该方法调用后将返回一个Table表。
3.Source&Sink
Table中Source表和Sink表具有相同的创建语义
1
2
3
4
5
6
7
8
9
10
11
12
13
14
15
16
17
18
19
20
21
22
23
24
25
26
27
28
29
30
31
32
33
34
35
|
t_env.sql_update(
"""
create table SourceOrSink (
word VARCHAR,
`count` BIGINT
) with (
'connector.type' = 'filesystem',
'format.type' = 'csv',
'connector.path' = '/tmp/input_or_output'
)
"""
)
t_env.sql_update(
"""
create table SourceOrSink (
username varchar,
sample_hash varchar,
api_or_web tinyint,
download_time timestamp(3)
) with (
'connector.type' = 'kafka',
'connector.version' = 'universal', # 不必指定具体的版本号
'connector.topic' = 'platform_download_log',
'connector.properties.zookeeper.connect' = 'localhost:2181',
'connector.properties.bootstrap.servers' = 'localhost:9092',
'connector.properties.scan.startup.mode' = 'latest-offset',
'format.type' = 'csv',
'format.ignore-parse-errors' = 'true' # 解析异常时,跳过当前字段数据(字段将置为null)
)
"""
)
|
1
2
3
4
5
6
7
8
9
10
11
12
13
14
15
16
17
18
19
20
21
22
23
24
25
26
27
28
29
30
31
32
33
34
35
36
37
38
39
40
41
42
43
44
45
46
47
48
49
50
51
52
53
54
55
56
57
|
"""
with_format: 告诉Flink如何处理源数据中的每个元素
with_schema: 定义表的结构
"""
t_env.connect(
FileSystem().path("file:///tmp/test_file")
).with_format(
OldCsv()
.field_delimiter(",")
.line_delimiter("\\n")
.field("a", DataTypes.INT())
.field("b", DataTypes.STRING())
).with_schema(
Schema()
.field("a", DataTypes.INT())
.field("b", DataTypes.STRING())
).create_temporary_table("source_or_sink")
t_env.connect(
Kafka()
.version("universal")
.topic("platform_download_log")
.property("zookeeper.connect", "localhost:2181")
.property("bootstrap.servers", "localhost:9092")
.start_from_latest()
).with_format(
Json()
.fail_on_missing_field(False)
.schema(DataTypes.ROW([
DataTypes.FIELD("username", DataTypes.STRING()),
DataTypes.FIELD("sample_hash", DataTypes.STRING()),
DataTypes.FIELD("api_or_web", DataTypes.TINYINT()),
DataTypes.FIELD("download_time", DataTypes.TIMESTAMP(3)),
]))
).with_schema(
Schema()
.field("username", DataTypes.STRING())
.field("sample_hash", DataTypes.STRING())
.field("api_or_web", DataTypes.TINYINT())
.field("download_time", DataTypes.TIMESTAMP(3))
).create_temporary_table("source_or_sink")
t_env.connect(
Elasticsearch()
.version("7")
.host("localhost", 9200, "http")
.index("test_sample_hash")
.document_type("_doc")
).with_format(
...
).with_schema(
...
).create_temporary_table("source_or_sink")
|
4.案例回顾
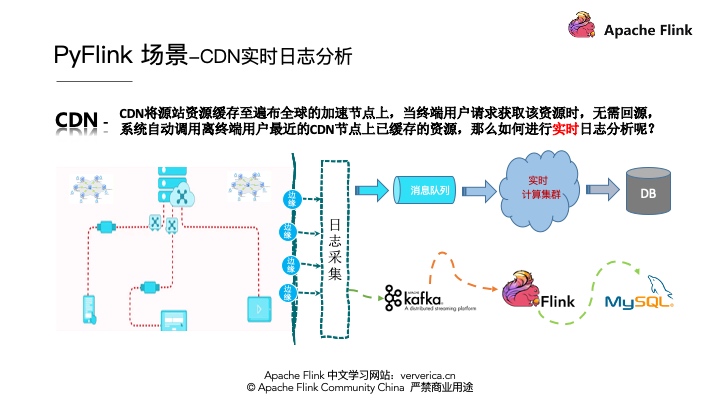
CDN日志的解析一般有一个通用的架构模式,就是首先要将各个边缘节点的日志数据进行采集,一般会采集到消息队列,然后将消息队列和实时计算集群集成进行实时的日志分析,最后将分析的结果写到存储系统里面。将架构实例化,消息队列采用Kafka,实时计算采用Flink,最终将数据存储到MySQL中。如下图所示:
1
| CDN日志假数据格式 "uuid,client_ip,request_time,response_size,uri"
|
本案例将从CDN访问日志中,获取如下统计指标:
- 按照地区统计资源访问量
- 按照地区统计资源下载量
- 按照地区统计资源平均下载速度
由于地区信息无法直接从访问日志中直接提取,Flink中也没有现成的transformation API,所以我们需要自定义实现一个逻辑函数。我们可以借助地理区域查询服务,根据IP地址获取地理位置信息。
5.用户自定义函数
Scalar Function将0、1或者多个值作为输入参数,最后返回一个值。
1
2
3
4
5
6
7
8
9
10
11
12
13
14
15
16
17
18
19
20
21
|
class Add(ScalarFunction):
def eval(self, i, j):
return i + j
add = udf(Add(), result_type=DataTypes.BIGINT())
@udf(result_type=DataTypes.BIGINT())
def add(i, j):
return i + j
add = udf(lambda i, j: i + j, result_type=DataTypes.BIGINT())
class CallableAdd(object):
def __call__(self, i, j):
return i + j
add = udf(CallableAdd(), result_type=DataTypes.BIGINT())
|
与Scalar Function类似,Table Function将0、1或者多个值作为输入参数。不同的是,后者能返回任意数量的行作为输出,而不是一个值,而且一行输出数据可以包含多个列。其返回类型可以是可迭代对象、迭代器或生成器。
演示:use_udf.py
1
2
3
4
5
6
7
8
9
10
11
12
13
14
15
16
17
18
19
20
21
22
23
24
25
26
|
class Split(TableFunction):
def eval(self, string):
for s in string.split(" "):
yield s, len(s)
split = udtf(
Split(),
input_types=DataTypes.STRING(),
result_types=[DataTypes.STRING(), DataTypes.INT()]
)
@udtf(result_types=DataTypes.BIGINT())
def generator_func(x):
yield 1
yield 2
@udtf(result_types=DataTypes.BIGINT())
def iterator_func(x):
return range(5)
@udtf(result_types=DataTypes.BIGINT())
def iterable_func(x):
result = [1, 2, 3]
return result
|
Aggregate Function用来针对一组数据进行自定义的聚合计算,每组将产生一条输出数据。
演示:use_udaf.py
1
2
3
4
5
6
7
8
9
10
11
12
13
14
15
16
17
18
19
20
21
22
23
24
25
26
27
28
29
30
31
32
|
"""
create_accumulator() 创建并初始化一个累加器
accumulate(...) 聚合逻辑实现,并更新累加器
get_value(...) 获取聚合结果值
retract(...) 从累加器中收回输入值
"""
class WeightAvg(AggregateFunction):
def create_accumulator(self):
return Row(0, 0)
def get_value(self, accumulator):
if accumulator[1] == 0:
return None
else:
return accumulator[0] / accumulator[1]
def accumulate(self, accumulator, value, weight):
accumulator[0] += value * weight
accumulator[1] += weight
def retract(self, accumulator, value, weight):
accumulator[0] -= value * weight
accumulator[1] -= weight
weighted_avg = udaf(WeightAvg(),
result_type=DataTypes.BIGINT(),
accumulator_type=DataTypes.ROW([
DataTypes.FIELD("f0", DataTypes.BIGINT()),
DataTypes.FIELD("f1", DataTypes.BIGINT()),
]))
|
6.案例实现
演示:cdn_demo.py
1
2
3
4
5
6
7
8
9
10
11
12
13
14
| @udf(input_types=[DataTypes.STRING()], result_type=DataTypes.STRING())
def ip_to_province(ip):
try:
urlobj = urlopen( \
'http://whois.pconline.com.cn/ipJson.jsp?ip=%s' % quote_plus(ip))
data = str(urlobj.read(), "gbk")
pos = re.search("{[^{}]+\}", data).span()
geo_data = json.loads(data[pos[0]:pos[1]])
if geo_data['pro']:
return geo_data['pro']
else:
return geo_data['err']
except:
return "UnKnow"
|
1
2
3
4
5
6
7
8
9
10
11
12
| t_env.from_path("cdn_access_log")\
.select("uuid, "
"ip_to_province(client_ip) as province, "
"response_size, request_time")\
.group_by("province")\
.select(
"province, count(uuid) as access_count, "
"sum(response_size) as total_download, "
"sum(response_size) * 1.0 / sum(request_time) as download_speed") \
.insert_into("cdn_access_statistic")
|
7.SQL优化
默认情况下,无界聚合算子按如下步骤处理记录:
(1)读取状态数据
(2)累加/撤回记录进行运算
(3)状态写回
(4)同上,处理下一条记录
这种处理方式会增加对statebackend的压力。MiniBatch聚合原理是缓存一定的记录后再触发聚合,以减少对state的访问次数,从而提升计算吞吐量。通常对于聚合的场景,MiniBatch可以提升系统性能,建议开启。
默认情况下,MiniBatch模式是被禁用的。如果要启用,请在作业中实例化TableEnvironment后插入如下代码。
1
2
3
4
5
6
7
| t_env = ...
configuration = t_env.get_config().get_configuration()
configuration.set_string("table.exec.mini-batch.enabled", "true")
configuration.set_string("table.exec.mini-batch.allow-latency", "5 s")
configuration.set_string("table.exec.mini-batch.size", "5000")
|
聚合业务场景下,数据流中的记录可能会产生倾斜,即分组产生出了“热点数据”大量地流向下游的某个(SUM、COUNT、MAX、MIN、AVG等)聚合算子实例。Local-Global原理是先在上游算子实例中进行本地聚合,输出本地聚合结果给下游算子,然后在下游算子进行全局聚合。
要启用该机制,请在作业中实例化TableEnvironment后插入如下代码。
1
2
3
4
5
| t_env = ...
configuration = t_env.get_config().get_configuration()
configuration.set_string("table.optimizer.agg-phase-strategy", "TWO_PHASE")
|
正则表达式(REGEXP、REGEXP_REPLACE)是非常耗时的操作,对比加减乘除通常有百倍的性能开销,而且正则表达式在某些极端情况下可能会陷入无限循环,导致作业阻塞。建议充分利用LIKE。
三、PyFlink DataStream API
1.执行上下文
1
2
3
4
5
6
7
8
9
10
11
12
13
14
15
16
17
18
19
|
from pyflink.datastream.stream_execution_environment import StreamExecutionEnvironment
env = StreamExecutionEnvironment.get_execution_environment()
from pyflink.dataset.execution_environment import ExecutionEnvironment
env = ExecutionEnvironment.get_execution_environment()
env.set_python_executable(...)
env.set_parallelism(...)
env.set_stream_time_characteristic(...)
env.add_jars(...)
"""故障恢复&容错"""
env.enable_checkpointing(...)
env.set_restart_strategy(...)
env.set_state_backend(...)
|
2.算子
1
2
| data_stream = env.from_collection(collection=[1, 2, 3, 4, 5])
data_stream.map(lambda x: 2 * x, output_type=Types.INT())
|
1
2
| data_stream = env.from_collection(collection=['hello apache flink', 'streaming compute'])
data_stream.flat_map(lambda x: x.split(' '), result_type=Types.STRING())
|
1
2
| data_stream = env.from_collection(collection=[0, 1, 2, 3, 4, 5])
data_stream.filter(lambda x: x != 0)
|
1
2
| data_stream = env.from_collection(collection=[(1, 'a'), (2, 'a'), (3, 'b')])
data_stream.key_by(lambda x: x[1], key_type_info=Types.STRING())
|
演示:rolling_aggregate.py
1
2
| data_stream = env.from_collection(collection=[(1, 'a'), (2, 'a'), (3, 'a'), (4, 'b')], type_info=Types.ROW([Types.INT(), Types.STRING()]))
data_stream.key_by(lambda x: x[1]).reduce(lambda a, b: (a[0] + b[0], b[1]))
|
max, min, sum等滚动聚合函数、window算子没有在PyFlink1.12.0中有对应接口实现。
shuffle 设置DataStream分区,以随机的方式将输出元素分布到下一个操作算子的实例上。
rebalance 设置DataStream分区,以轮询的方式将输出元素均匀分布到下一个操作算子的实例上。
3.Source&Sink
PyFlink1.12.0的datastream.connector模块下,包含了一些内建可用的Source/Sink连接器,目前内置的连接器如下:
| 组件 |
Source |
Sink |
| KafkaConnector |
支持 |
支持 |
| JDBCConnector |
不支持 |
支持 |
| StreamingFileConnector |
不支持 |
支持 |
1
2
3
4
5
6
7
8
9
10
11
|
kafka_consumer = FlinkKafkaConsumer(
topics="zer0py2c_source",
deserialization_schema=SimpleStringSchema(),
properties={
"bootstrap.servers": "localhost:9092",
"zookeeper.connect": "localhost:2181"
}
)
env.add_source(kafka_consumer)
|
1
2
3
4
5
6
7
8
9
10
11
|
kafka_producer = FlinkKafkaProducer(
topic="zer0py2c_sink",
serialization_schema=SimpleStringSchema(),
producer_config={
"bootstrap.servers": "localhost:9092",
"zookeeper.connect": "localhost:2181"
}
)
data_stream.add_sink(kafka_producer)
|
1
2
3
4
5
6
7
8
9
10
11
12
13
14
15
16
17
|
options = JdbcConnectionOptions.JdbcConnectionOptionsBuilder() \
.with_user_name("zer0py2c") \
.with_password("123456") \
.with_driver_name("com.mysql.jdbc.Driver") \
.with_url("jdbc:mysql://localhost:3306/flink") \
.build()
mysql_sink = JdbcSink.sink(
"insert into test_sink_table(`id`, `content`) values(?, ?)",
type_info=Types.ROW([Types.INT(), Types.STRING()]),
jdbc_connection_options=options
)
array = [(1, 'aaa|bb'), (2, 'bb|a'), (3, 'aaa|a')]
data_stream = env.from_collection(array)
data_stream.add_sink(mysql_sink)
|
StreamingFileSink将数据写入存储桶,每个桶中的数据被组织为多个Part File,每个Part File由Sink的一个子任务负责写入。
1
2
3
4
5
6
7
8
9
10
11
12
13
14
15
16
17
18
19
20
21
22
23
|
"""
如下代码指定了滚动策略:只要下列三个条件中的一条成立,则滚动当前正在写入的Part File
Part File保持打开状态已达到60秒
Part File在过去60秒内都没有收到数据
Part File体量已经达到128MB
"""
bucket_sink = StreamingFileSink.for_row_format(
"file:///tmp/bucket", SimpleStringEncoder()
).with_rolling_policy(
DefaultRollingPolicy.builder()
.with_rollover_interval(60 * 1000)
.with_inactivity_interval(60 * 1000)
.with_max_part_size(128 * 1024 * 1024)
.build()
).with_output_file_config(
OutputFileConfig.builder()
.with_part_prefix("platform_process_log")
.with_part_suffix(".csv")
.build()
)
data_stream.add_sink(bucket_sink)
|
四、时间语义与窗口
1.时间语义
EventTime 数据创建时间,可以从原始数据中提取时间戳
IngestionTime 数据接入Flink的时间
ProcessingTime 数据进入Flink操作算子的时间
由于网络波动等原因,Source数据通常不会按照EventTime的先后顺序进入Flink,在经过Transformation处理后输出无序也是自然的。考虑这样的场景,业务需要统计出某样本管理平台每小时内不同用户的样本下载情况(日志),如果应用默认的处理时间,那么统计出来的结果将和预期偏差较大!
1
2
3
4
| tumb_window = Tumble.over("60.minutes").on("rowtime").alias("w")
my_table.window(tumb_window) \
.group_by("username", "w") \
.select("username, count(sample_hash) as total, w.start, w.end")
|
因此务必做出如下两个保证:
(1)让Flink以EventTime语义来处理记录——Extract EventTime
(2)让Flink明确触发计算的条件——WaterMark
WaterMark时间戳 >= window_end_time && [window_start_time, window_end_time)内有记录
1
2
3
4
5
6
7
8
9
10
11
12
13
14
15
16
17
18
19
20
21
22
23
24
25
26
27
28
29
30
|
t_env.connect(
Kafka()
.version("universal")
.topic("platform_download_log")
.property("zookeeper.connect", "localhost:2181")
.property("bootstrap.servers", "localhost:9092")
.start_from_latest()
).with_format(
Json()
.fail_on_missing_field(False)
.schema(DataTypes.ROW([
DataTypes.FIELD("username", DataTypes.STRING()),
DataTypes.FIELD("sample_hash", DataTypes.STRING()),
DataTypes.FIELD("api_or_web", DataTypes.TINYINT()),
DataTypes.FIELD("download_time", DataTypes.TIMESTAMP(3)),
]))
).with_schema(
Schema()
.field("username", DataTypes.STRING())
.field("sample_hash", DataTypes.STRING())
.field("api_or_web", DataTypes.TINYINT())
.field("download_time", DataTypes.TIMESTAMP(3))
.rowtime(
Rowtime()
.timestamps_from_field("download_time")
.watermarks_periodic_bounded(60 * 1000)
)
)
|
1
2
3
4
5
6
7
8
9
10
11
12
13
14
15
16
17
18
19
20
21
|
t_env.sql_update(
"""
create table KafkaSource (
username varchar,
sample_hash varchar,
api_or_web tinyint,
download_time timestamp(3),
watermark for download_time as download_time - interval '60' second # 设置EventTime
) with (
'connector.type' = 'kafka',
'connector.version' = 'universal', # 不必指定具体的版本号
'connector.topic' = 'platform_download_log',
'connector.properties.zookeeper.connect' = 'localhost:2181',
'connector.properties.bootstrap.servers' = 'localhost:9092',
'connector.properties.scan.startup.mode' = 'latest-offset',
'format.type' = 'csv',
'format.ignore-parse-errors' = 'true' # 解析异常时,跳过当前字段数据(字段将置为null)
)
"""
)
|
2.窗口类型
将数据按照固定的窗口长度进行划分,窗口无重叠。这个固定的窗口长度既可以是时间, 也可以是数量。

将数据按照固定的窗口长度+滑动间隔进行划分,窗口有重叠。这个固定的窗口长度既可以是时间,也可以是数量。当“滑动间隔=窗口长度”时,退化为滚动窗口。

指定一个具有时间长度的Gap,若Gap时间内都没有收到新数据,则开一个新的窗口。

3.Group Window
时间语义,需要结合窗口操作才能充分应用起来。如下以Table API为例,介绍Flink中窗口的代码操作。
1
2
3
4
| my_table = t_env.from_path(...)
my_table.window(my_window as "w")
.group_by("other_column", "w")
.select("...")
|
1
2
3
4
5
6
|
tumb_window = Tumble.over("10.minutes").on("rowtime").alias("w")
tumb_window = Tumble.over("10.minutes").on("proctime").alias("w")
tumb_window = Tumble.over("10.rows").on("proctime").alias("w")
|
1
2
3
4
5
6
|
slid_window = Slide.over("10.minutes").every("5.minutes").on("rowtime").alias("w")
slid_window = Slide.over("10.minutes").every("5.minutes").on("proctime").alias("w")
slid_window = Slide.over("10.rows").every("5.minutes").on("proctime").alias("w")
|
1
2
3
4
|
session_window = Session.with_gap("10.minutes").on("rowtime").alias("w")
session_window = Session.with_gap("10.minutes").on("proctime").alias("w")
|
五、容错配置
1.启用一致性checkpoint
1
2
3
4
5
6
7
8
9
10
11
12
|
env.enable_checkpointing(mode=CheckpointingMode.EXACTLY_ONCE)
env.get_checkpoint_config().set_checkpoint_interval(300)
env.get_checkpoint_config().set_checkpoint_timeout(60000)
env.get_checkpoint_config().set_max_concurrent_checkpoints(1)
env.get_checkpoint_config().set_min_pause_between_checkpoints(100)
env.get_checkpoint_config().set_fail_on_checkpointing_errors(True)
|
2.配置状态后端statebackend
1
2
3
4
5
6
7
|
env.set_state_backend(MemoryStateBackend())
env.set_state_backend(FsStateBackend("file:///var/checkpoints/"))
env.add_jar("file:///.../flink-statebackend-rocksdb_2.11-1.12.0.jar")
env.set_state_backend(RocksDBStateBackend("file:///var/checkpoints/"))
|
3.配置重启策略
1
2
3
4
5
6
|
env.set_restart_strategy(RestartStrategies.no_restart())
env.set_restart_strategy(RestartStrategies.fixed_delay_restart(3, 10 * 1000))
env.set_restart_strategy(RestartStrategies.failure_rate_restart(3, 5 * 60 * 1000, 10 * 1000))
|
六、一个案例
基于PyFlink流计算的商品价格实时监控系统